

Send environment and lead_type with every Lead. Create a custom conversion requiring Lead AND environment=prod AND lead_type=preorder, then select that custom conversion in the ad set. Development events fail these rules, but all data collected by the shared Pixel is not isolated.
The screenshots marked “illustrative UI” are AI-generated tutorial reconstructions, not live account captures or execution results. Domains and identifiers are examples. Actual menu layouts and available options can vary by account. The two cropped GTM captures at the end are real settings screens.
A test application is still a Lead to Meta
Imagine submitting a preorder on a development site. The confirmation appears and a Lead reaches Meta. The connection works, but a customer's application and a developer's test now share the same event name.
Disabling the Pixel in development prevents this traffic from reaching the shared data source, but also removes end-to-end validation before release. This guide addresses the case where you want to receive development events and exclude them from a particular production conversion definition.
The example uses www.example.com and example.com for production, and dev.example.com for development. Both use one Pixel. Only the shared Pixel setup was confirmed in the source configuration; Lead wiring, custom conversions, ad set selection, and CAPI are follow-up procedures, not verified production outcomes.
Define eligible conversions inside the shared data source
The deciding question is whether development events must be separated at collection time. If they must, consider a dedicated development Pixel. The shared-Pixel approach is appropriate when filtering the selected conversion definition meets your requirements.
environment is a custom event parameter. It is not a reserved Meta testing switch. Sending dev does not automatically quarantine the event. This design separates the rules of the selected custom conversion and the optimization goal that uses it; it does not establish that development data has no influence anywhere else in Meta.
Meta distinguishes event custom properties and custom conversions. Other audiences or reports using all Lead events require their own review.
Why GA4 and Naver use different boundaries
| Tool | Example policy | Boundary to check |
|---|---|---|
| Meta Pixel | Shared Pixel; environment on every event | Custom conversion rules and ad set selection |
| GA4 | Different Measurement IDs | Streams in one property may still share reports |
| Naver advertising tag | Block DEV with a nonproduction exception | Verify the tag actually remains blocked |
A GA4 Measurement ID identifies a web data stream. Different IDs do not necessarily separate property-level reporting; check the property and stream hierarchy. In this example, Naver prioritizes blocking development execution, while Meta requires development event inspection. A common environment variable can support different tag policies.
If the Pixel already runs through GTM Custom HTML, this change does not require another tool. When migrating to a template or plugin later, check for duplicate installations.
Connect the hostname, PageView, and successful application in GTM
1. Recognize only production hosts as prod
Enable the built-in Page Hostname variable. Create a Lookup Table named ENV - environment with input {{Page Hostname}}. Hostnames do not contain a protocol or path.
| Exact input | Output |
|---|---|
| www.example.com | prod |
| example.com | prod |
| dev.example.com | dev |
| Default | dev |
The dev default prevents an unknown preview hostname or localhost from automatically becoming a production conversion candidate. It classifies events; it does not block transmission. Do not use “URL contains example.com”: dev.example.com contains that string too.
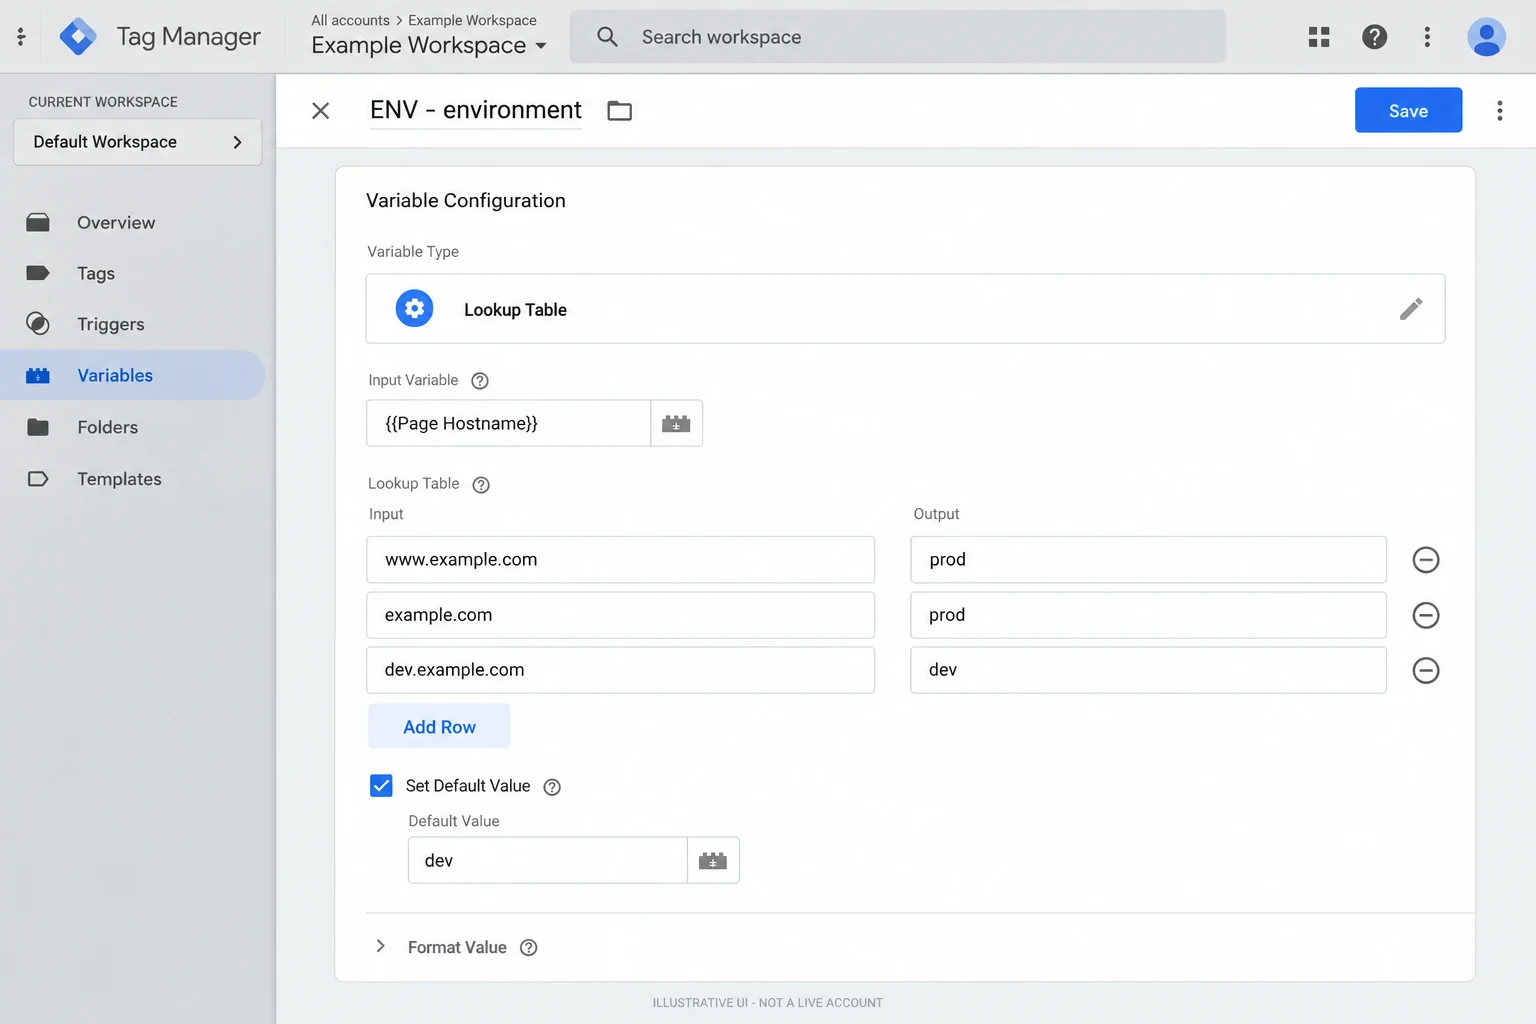
Illustrative UI 1: AI-generated reconstruction. Use the exact values in the accompanying text.
2. Prepare the Pixel first and send PageView once
Use Initialization - All Pages for the existing Base Pixel tag. Retain the Meta loader and actual Pixel initialization. Replace the existing PageView call with this excerpt; appending it would send a duplicate PageView.
fbq('track', 'PageView', {
  environment: '{{ENV - environment}}'
});
Initialization runs after Consent Initialization and before other page-load triggers. Actual transmission must also meet the site's consent conditions. All Pages describes the execution trigger, not permission to skip consent controls.
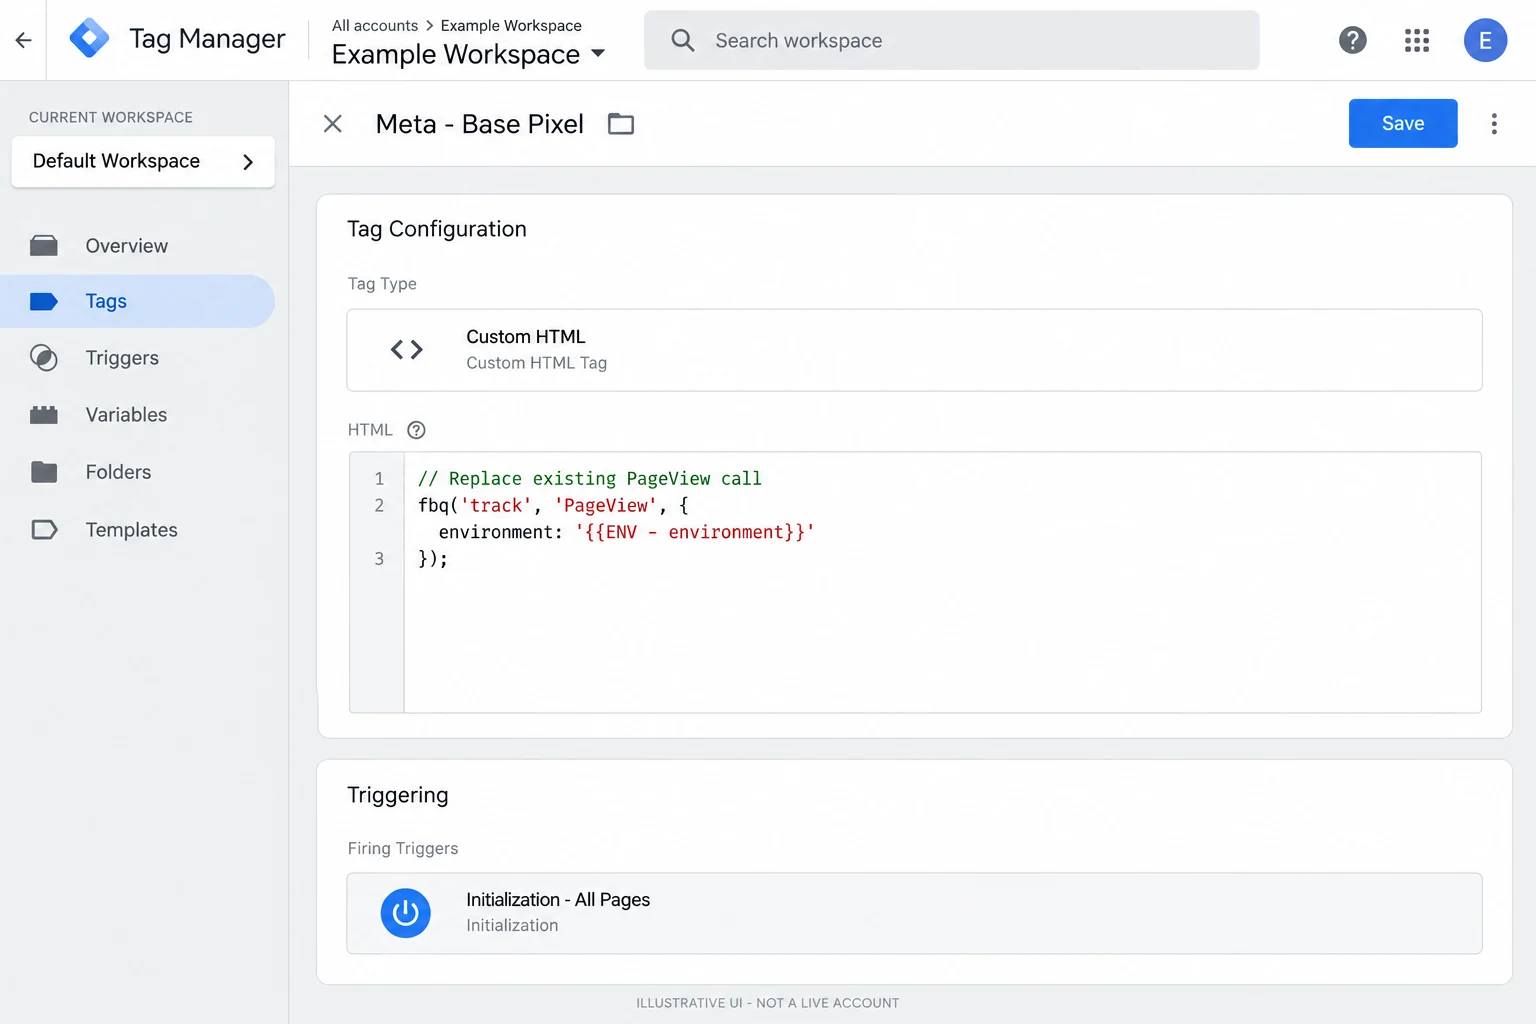
Illustrative UI 2: AI-generated reconstruction. Use the exact values in the accompanying text.
3. Send generate_lead only after successful submission
A click can fail validation or result in a rejected server request. Fire the success event after the server confirms that the application was accepted, once per successful application.
window.dataLayer = window.dataLayer || [];
window.dataLayer.push({
  event: 'generate_lead',
  lead_type: 'preorder'
});
Push the event and its associated values together so GTM can read them when processing that event. Every application type must explicitly set its own lead_type to avoid reusing a previous value on the same page.
If the site already emits a success event, verify its name and timing instead of adding another push. generate_lead is the agreed example contract here; align it with the actual implementation. The console image below illustrates the data shape, not a verified submission or an instruction to test against production.
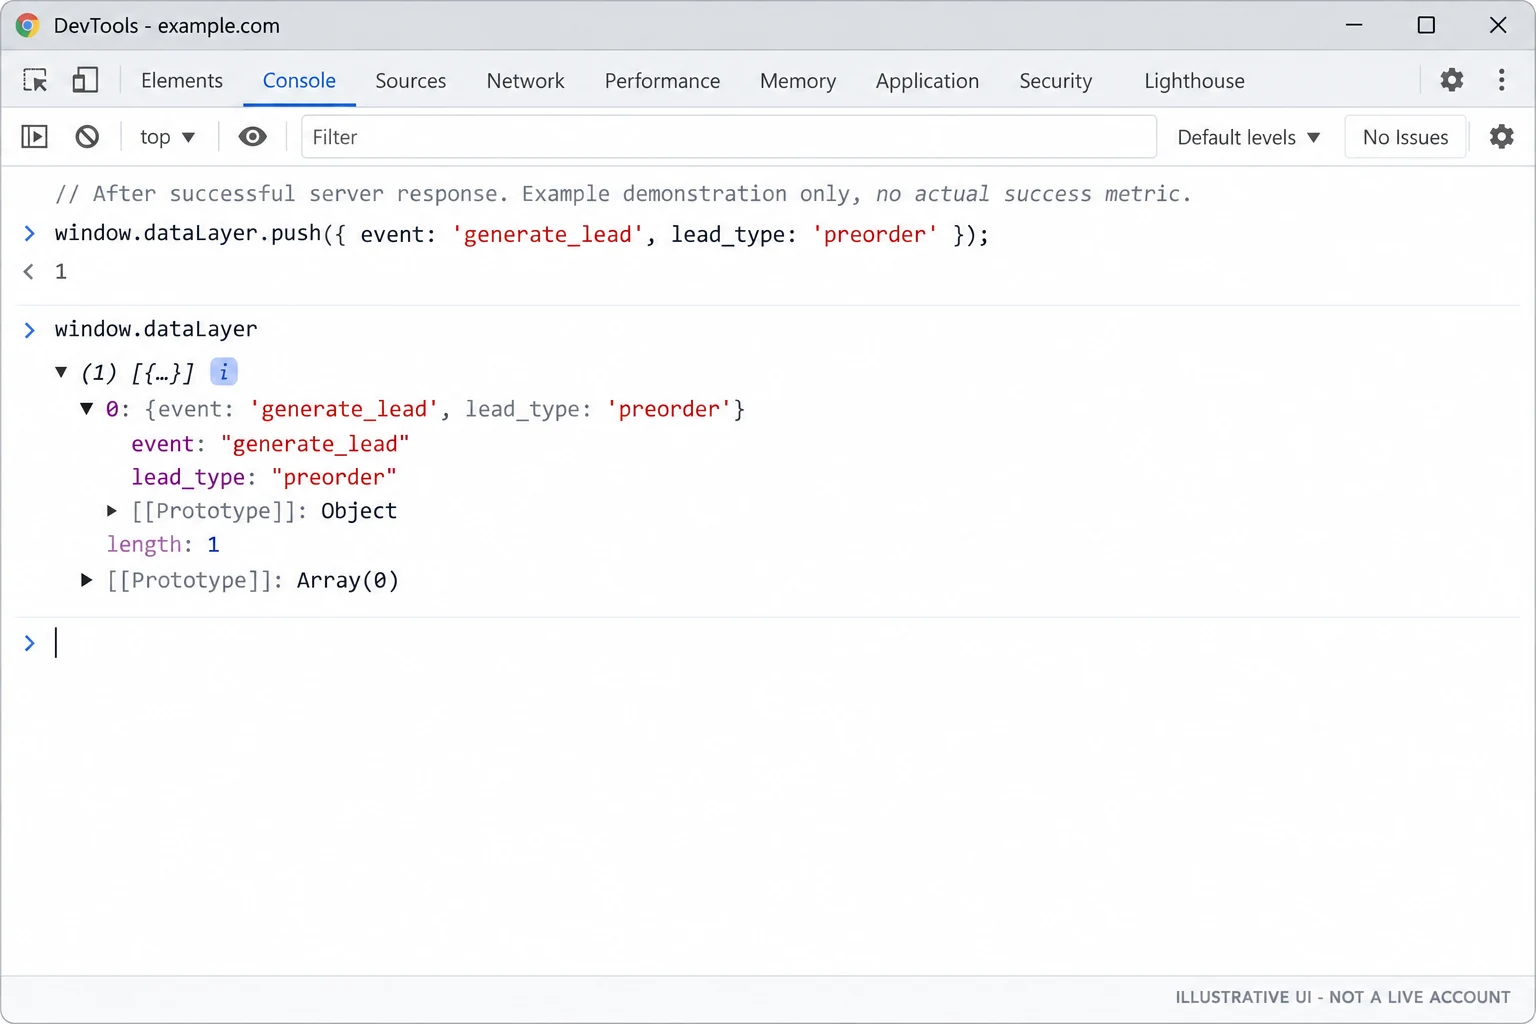
Illustrative UI 3: AI-generated reconstruction. Use the exact values in the accompanying text.
4. Read the application type and create a dedicated trigger
Create a Data Layer Variable named DLV - lead_type. Set its Data Layer Variable Name to lead_type, use Version 2, and leave the default unset. A missing value must not silently become preorder.
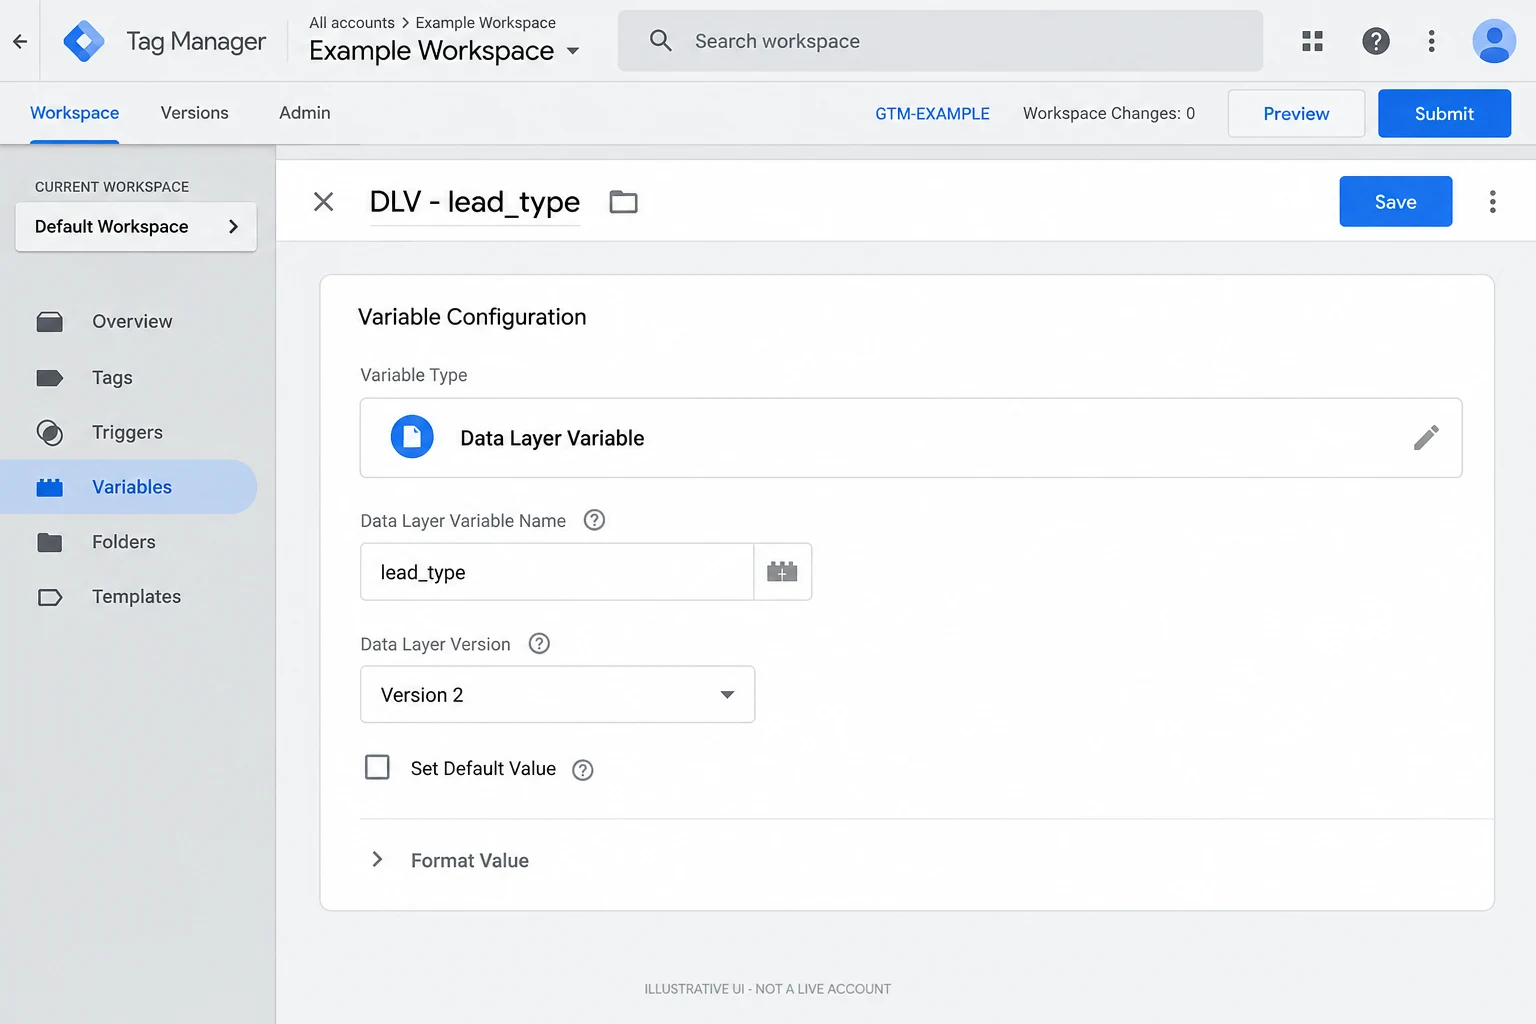
Illustrative UI 4: AI-generated reconstruction. Use the exact values in the accompanying text.
Create a Custom Event trigger named CE - generate_lead - preorder. Use the exact event name generate_lead, select Some Custom Events, and add {{DLV - lead_type}} equals preorder. Do not add a prod-only trigger restriction: development reception is part of this design.
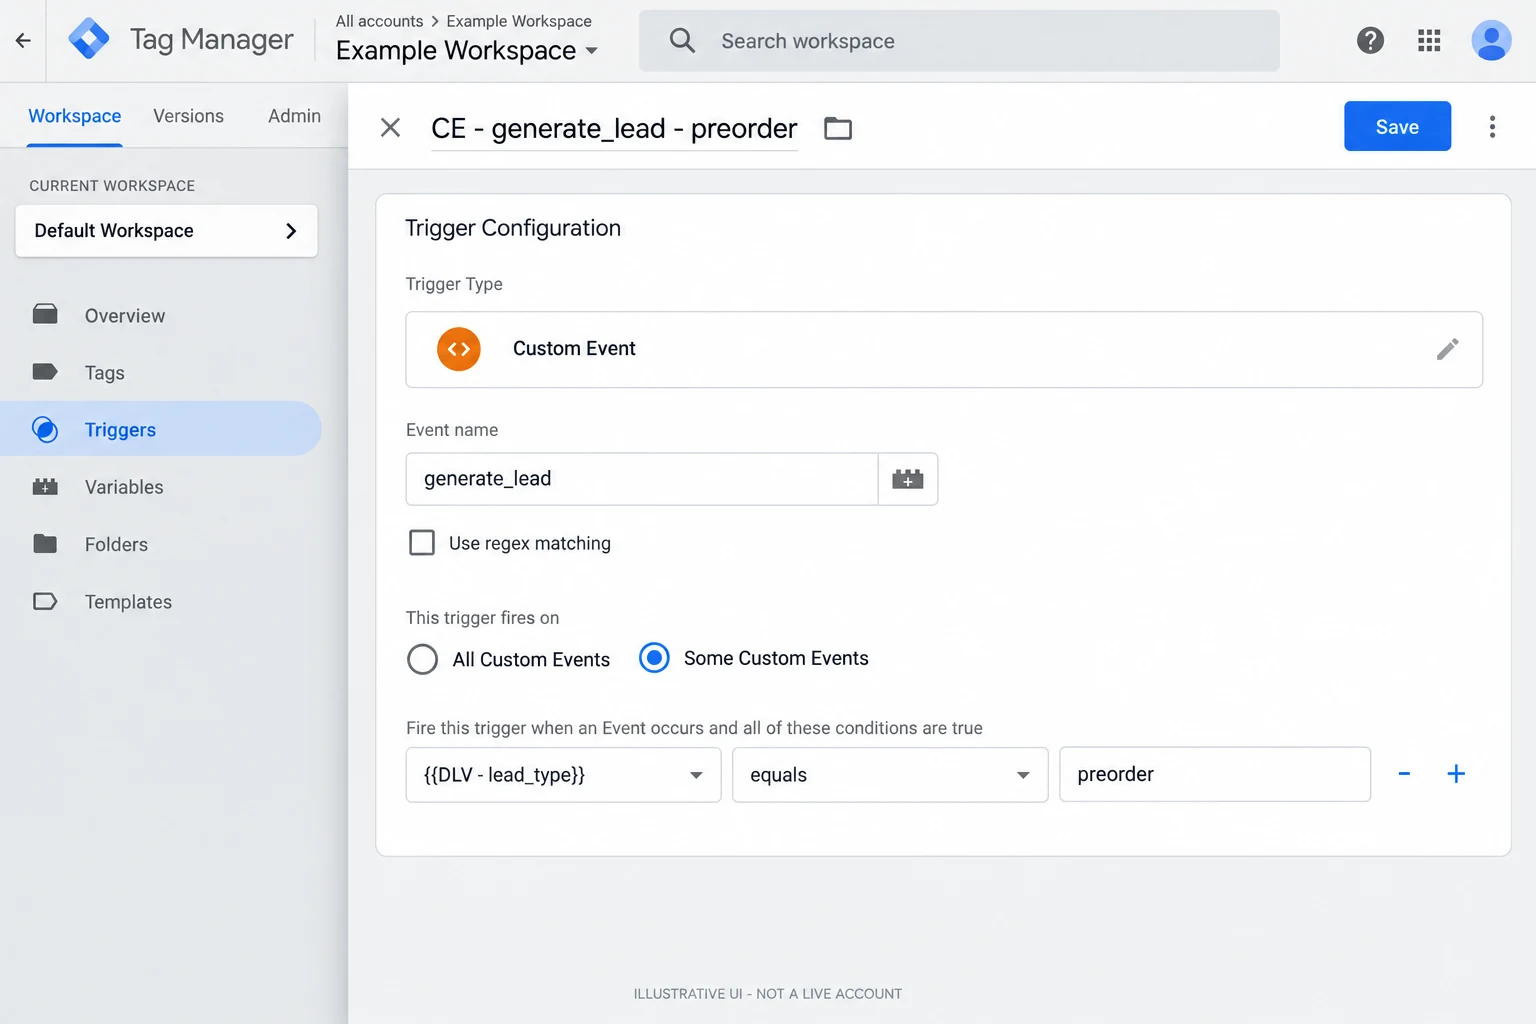
Illustrative UI 5: AI-generated reconstruction. Use the exact values in the accompanying text.
5. Include environment on the Lead itself
Create the Custom HTML tag Meta - Lead - preorder and attach the dedicated trigger.
<script>
fbq('track', 'Lead', {
  lead_type: 'preorder',
  environment: '{{ENV - environment}}'
});
</script>
The fixed preorder value is appropriate because this tag and trigger are dedicated to preorders. Combining multiple application types requires updating both values and conditions, then checking missing and stale values.
PageView parameters are not inherited by Lead. Check environment in the Lead payload independently. The Base Pixel must be ready first; inspect initialization order and any fbq is not defined errors, including flows where consent is granted later. Do not hide a missing event behind a silent guard.
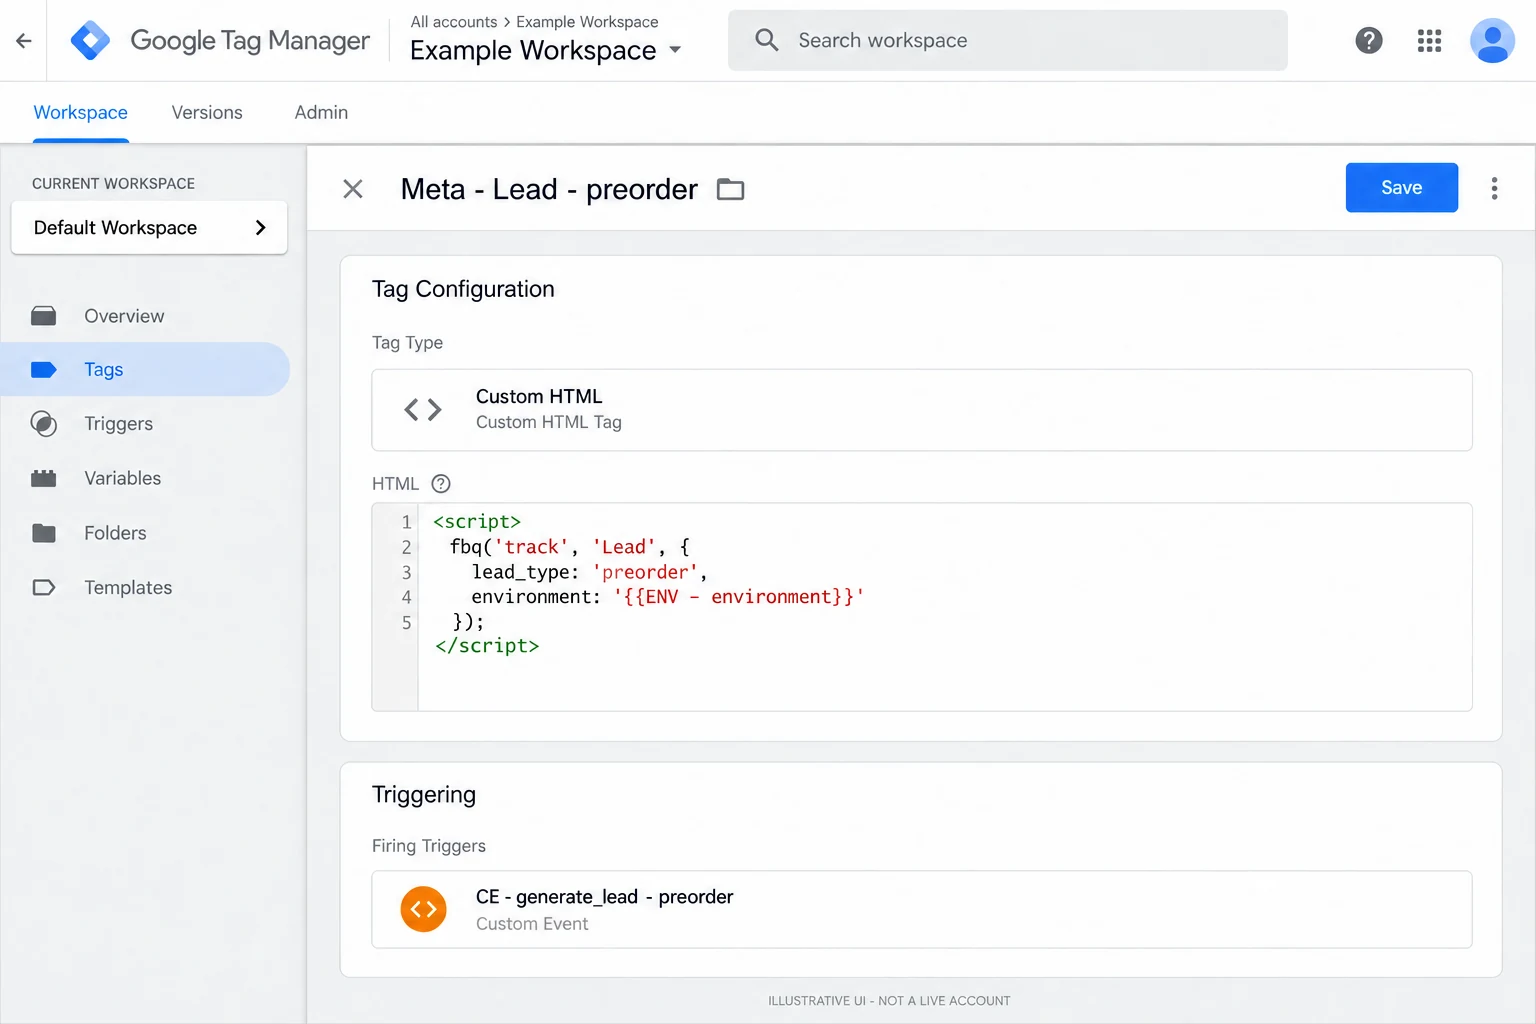
Illustrative UI 6: AI-generated reconstruction. Use the exact values in the accompanying text.
In Meta, require all three conversion conditions
Inspect a received Lead in Events Manager and confirm that environment and lead_type arrived. Select the shared data source and Lead event when creating the custom conversion, then add separate parameter rules.
Event = Lead
AND environment = prod
AND lead_type = preorder
Name it PROD - Lead - preorder. Meta's custom conversion guidance distinguishes AND between separate rules from OR between multiple values within one rule. Review the final rule summary.
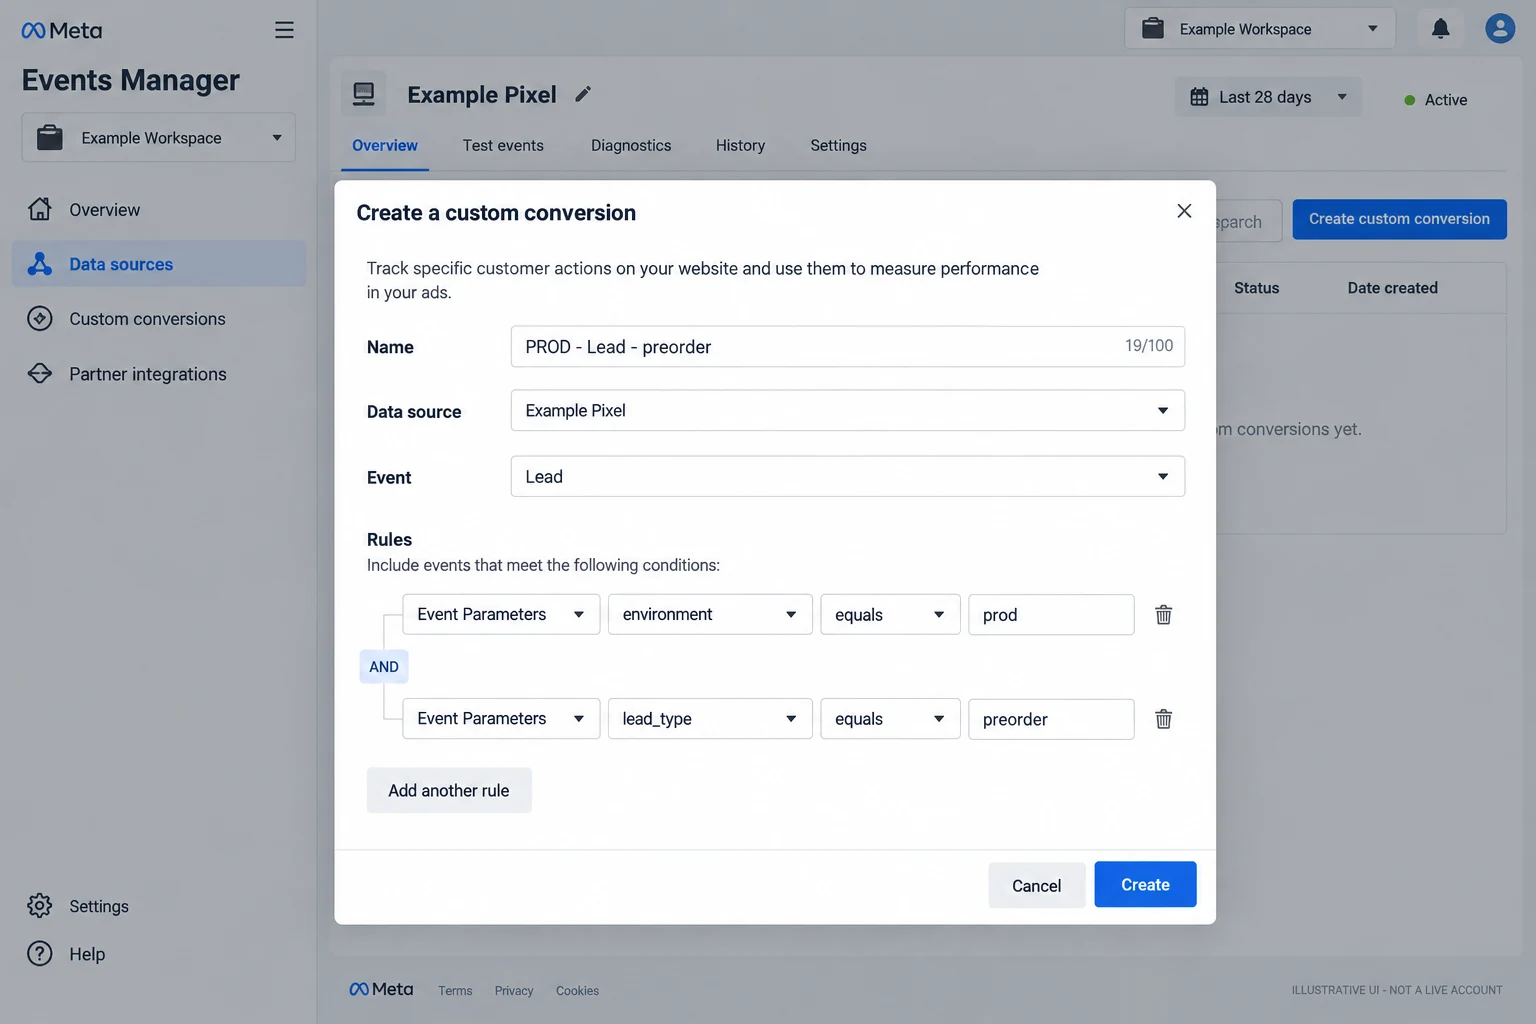
Illustrative UI 7: AI-generated reconstruction. Use the exact values in the accompanying text.
If parameters cannot be selected as rules, or the custom conversion is unavailable for the intended goal, the setup is not complete. Check received values, the data source, permissions, and account availability. Do not substitute an overly broad URL-contains rule.
After creating the conversion, verify its active state with qualifying activity. Remember that a test on a production hostname is classified as prod.
Select the custom conversion in the ad set
For an ad set and campaign goal that support website conversion optimization, choose the same data source and select PROD - Lead - preorder as the conversion event. Creating a custom conversion alone does not update an ad set still targeting generic Lead.
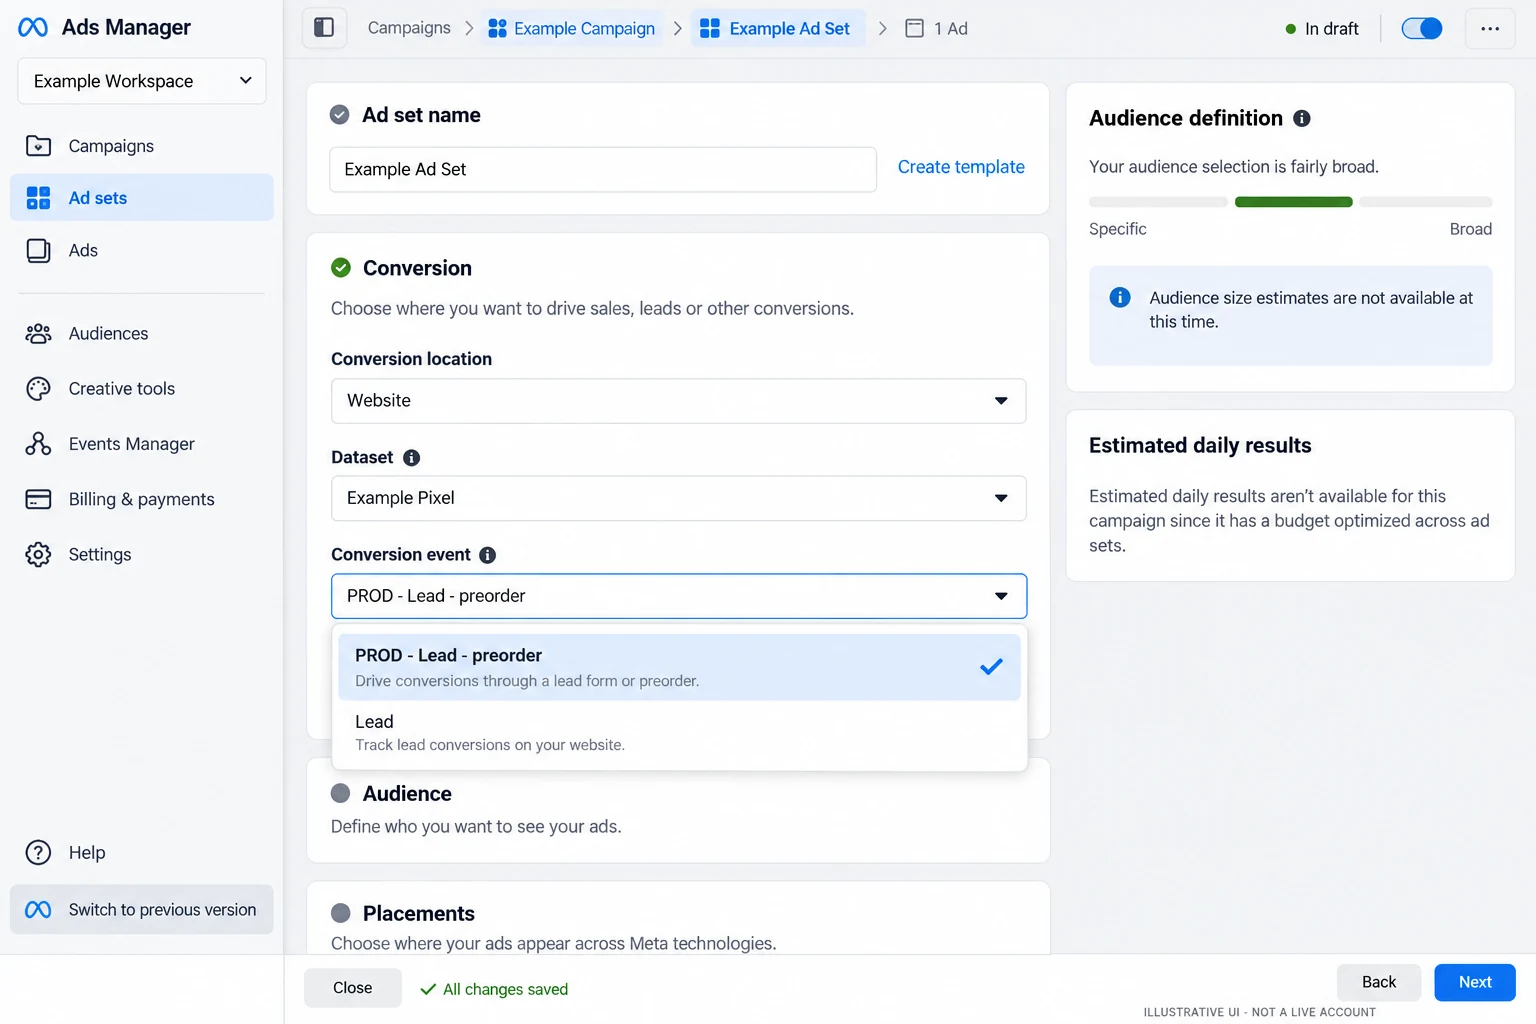
Illustrative UI 8: AI-generated reconstruction. Use the exact values in the accompanying text.
Check the reporting columns as well. Development events remain visible in the overall Lead reception history. That is expected. Custom conversion counts and conversions attributed to ads can also differ because attribution and counting conditions are different.
QA must check execution, reception, and exclusion
A fired tag in GTM is not proof that Meta received the event. Follow the chain from GTM Preview to the browser request, Meta event details, and the final conversion rules.
| Scenario | Expected values | Production rule |
|---|---|---|
| Production preorder success | Lead / prod / preorder | Included |
| Development preorder success | Lead / dev / preorder | Excluded |
| Unknown host | Lead / dev / preorder | Excluded; transmission is not blocked |
| Production visit only | PageView / prod | Excluded |
| Another application type | Lead / prod / another value | Excluded |
| Missing parameters | Lead / missing value | Must be excluded |
| Employee test on production | Lead / prod / preorder | Included |
This table describes expected results, not measurements. Matching a rule does not guarantee one ad-attributed conversion. A hostname identifies where the event occurred, not who submitted it or why. Excluding employee tests on production requires an additional validated test indicator and conversion condition.
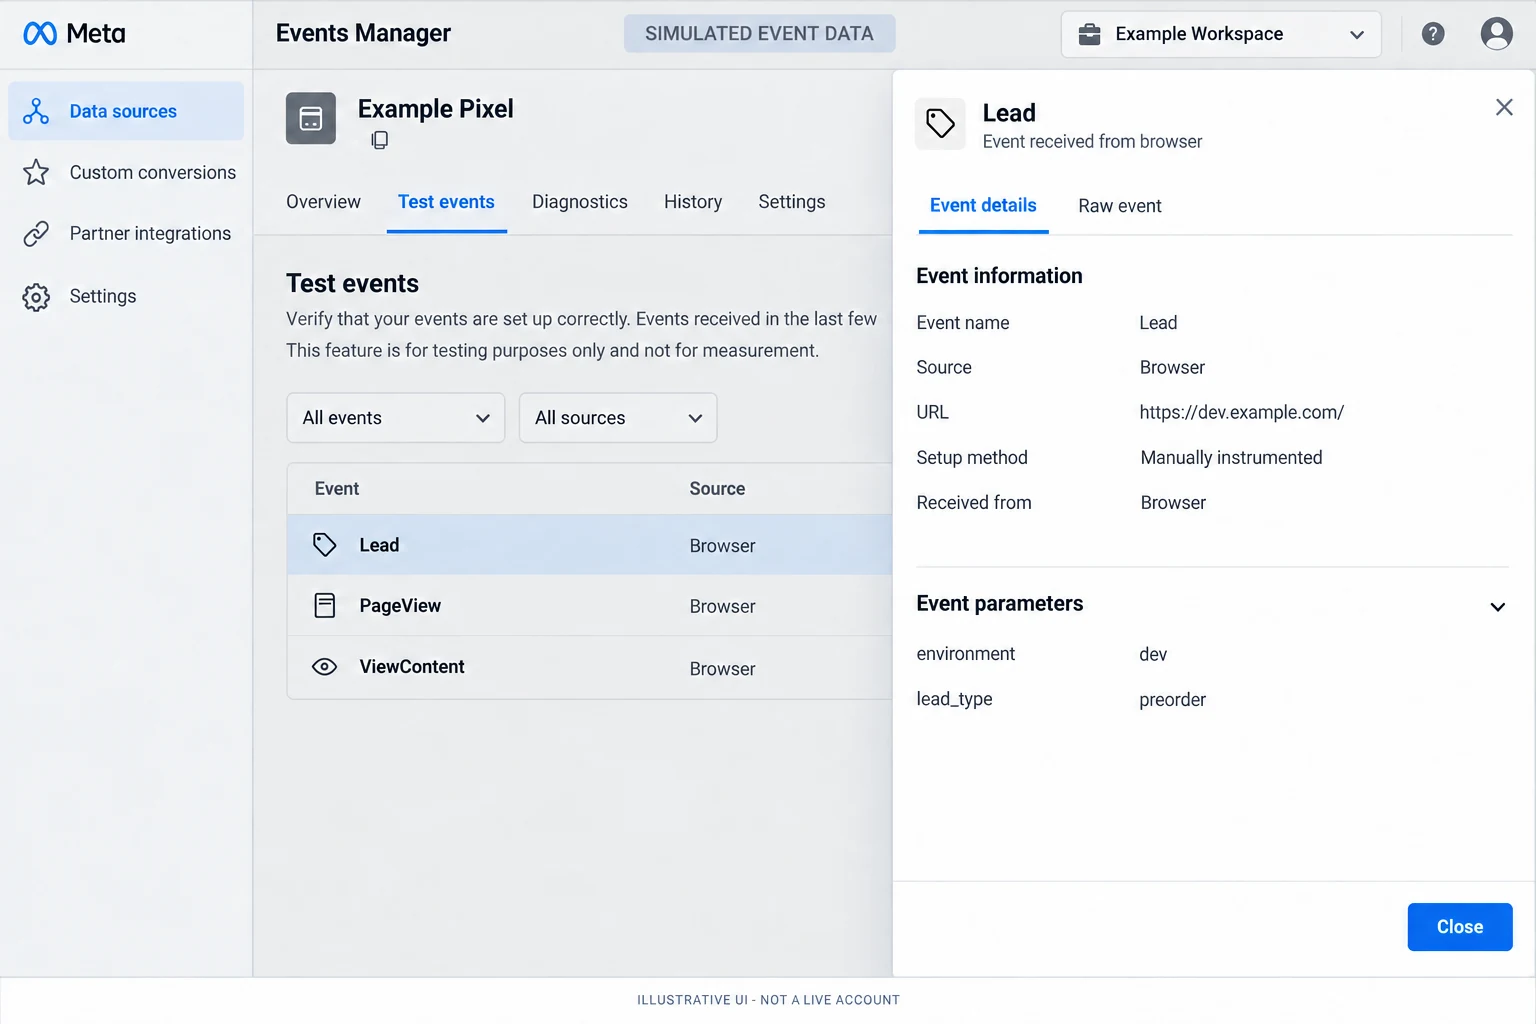
Illustrative UI 9: AI-generated reconstruction. Use the exact values in the accompanying text.
- Check www, root, development, and the final hostname after redirects.
- Check Base Pixel readiness and duplicate installation or PageView calls.
- Confirm failed submissions, repeated clicks, and refreshes do not add Leads.
- Inspect both parameters in Meta, not only GTM's fired status.
- Test production inclusion and development, other-type, and missing-value exclusion.
- Check the selected custom conversion in the ad set and reports.
- After publishing the approved GTM version, recheck outside Preview.
If an event is absent, inspect consent conditions, blockers, browser errors, allowed-domain settings, and reception delay. Do not assume delay before validating the request.
When adding CAPI, identify the same application on both paths
CAPI sends events from the server. It is a future extension here. Determine environment from trusted server configuration, not blindly from a browser-supplied value, and include environment and lead_type inside custom_data.
To deduplicate browser and server events, use the same Pixel, matching event names, and the same identifier for the same application.
fbq('track', 'Lead', {
  environment: '{{ENV - environment}}',
  lead_type: 'preorder'
}, {
  eventID: '{{DLV - event_id}}'
});
{
"event_name": "Lead",
"event_id": "prod:preorder:example-001",
"custom_data": {
"environment": "prod",
"lead_type": "preorder"
}
}Add DLV - event_id during this extension. Send the server-generated ID in the success response and dataLayer and reuse it in the server request. These excerpts are not a complete CAPI payload: event_time, action_source, user_data, and applicable website event information are also required. Keep access tokens on the server.
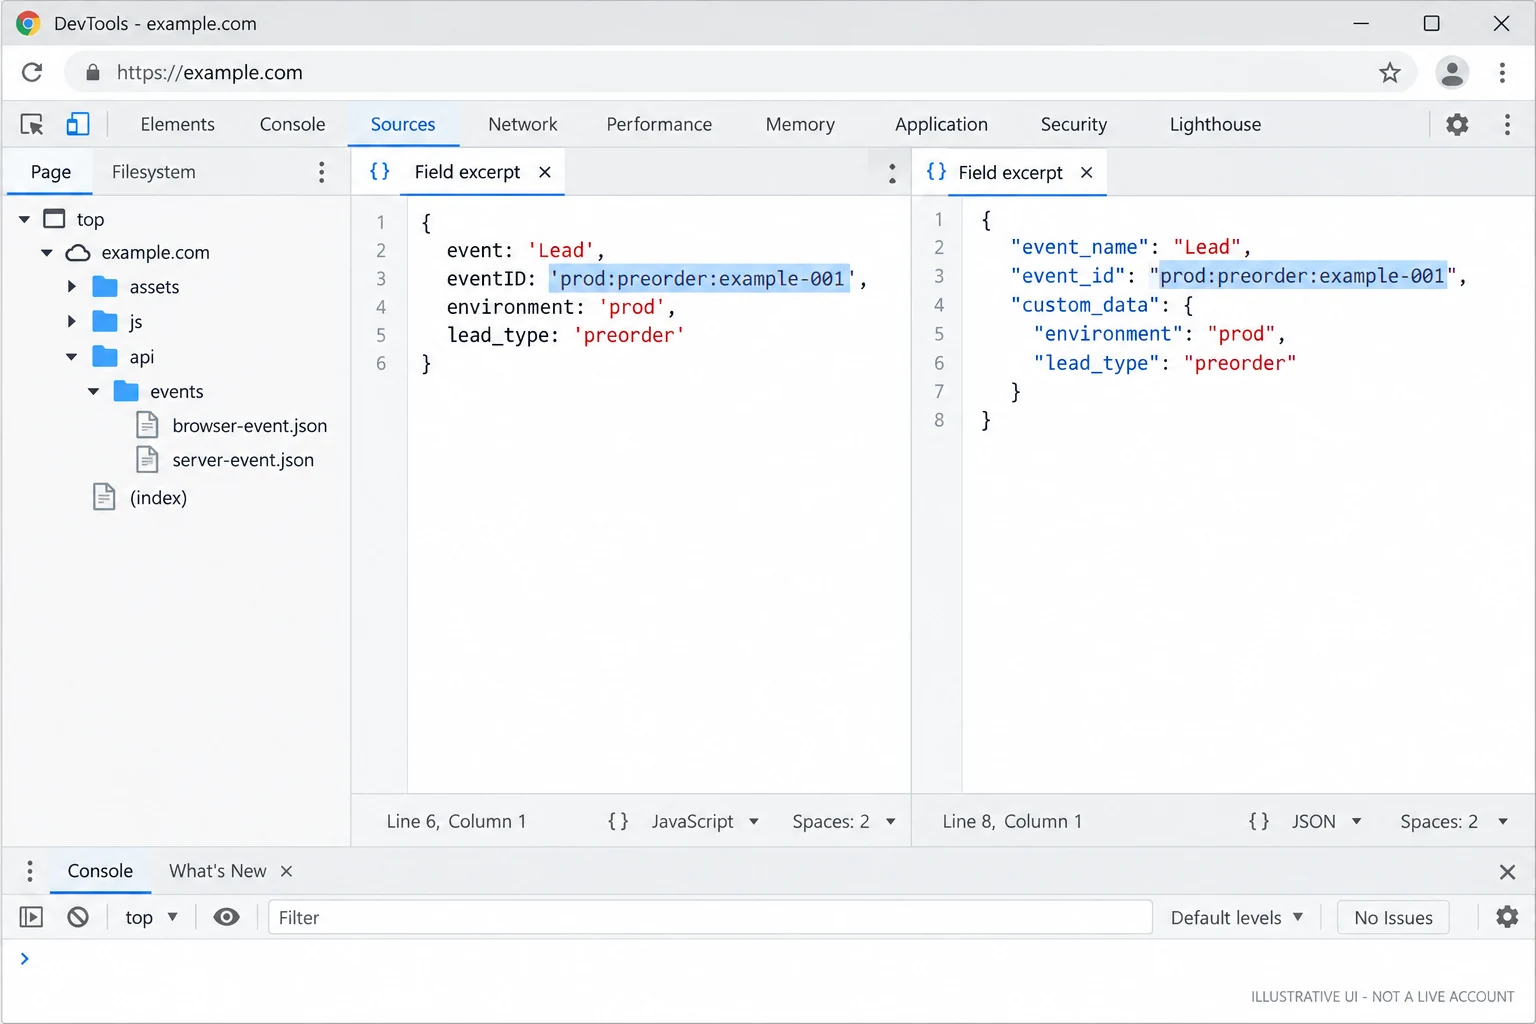
Illustrative UI 10: AI-generated reconstruction. Use the exact values in the accompanying text.
Use a unique ID for each successful application and preserve it on retries. Independently generated random IDs will not match. Separate production and development ID spaces as well. Deduplication does not repair inconsistent environment values, so check both parameters on both paths.
test_event_code is a separate testing feature; remove it from actual production requests as instructed by Meta. It does not replace environment and should not be described as a guarantee of complete data isolation.
An arriving event proves a connection. Checking which applications count toward the goal completes the setup.
Two actual GTM settings captures
The following cropped captures show an existing initialization trigger and the existing common generate_lead trigger. Identifying surrounding regions are excluded. The latter does not yet contain the preorder restriction from the tutorial and is not evidence of completed Meta Lead wiring.

Actual GTM settings capture, September 10, 2026.
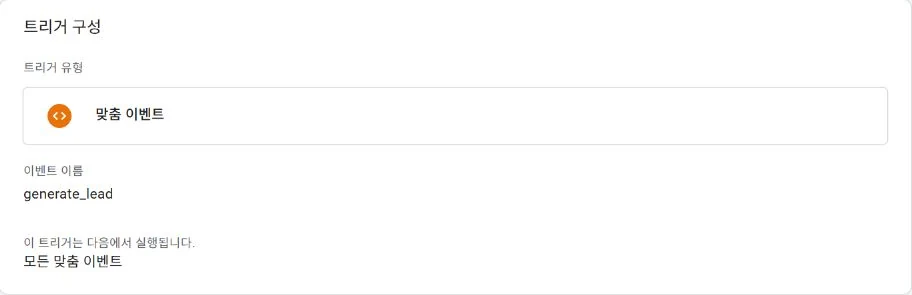
Actual GTM settings capture, September 10, 2026.
Sources and scope
- Meta Pixel conversion tracking
- Meta custom conversion rules
- Meta deduplication
- Conversions API requests and testing
- GTM page-view triggers
- Google dataLayer
- GA4 hierarchy
Documentation reviewed September 10, 2026. Publishing this guide did not create custom conversions, change ad sets, or send live Lead events. The guide uses anonymous example domains and names.
Found this useful? Share it
Latest posts
Kakao Share Thumbnail Not Showing? Here's the Fix (JavaScript SDK 2025)
Learn why Kakao Share thumbnails don't appear even with a valid imageUrl, and fix it using scrapImage to convert your URL into a KAGE CDN URL. Step-by-step guide.
How to Generate CRM User Manuals in 20 Minutes with Claude Code Sub-Agents
Learn how Claude Code sub-agents can analyze your CRM codebase and auto-generate user manuals and visual guidebooks in just 20 minutes. See the real-world results.
GEO Generative Engine Optimization: The Complete 2025 AI Marketing Strategy Guide
Learn what GEO (Generative Engine Optimization) is, how it differs from traditional SEO, and discover 5 proven AI marketing strategies to get cited by AI search engines in 2025.
Related projects
Get new posts by email
Insights on marketing, analytics, and dev, delivered to your inbox.