
How to use Claude Code starts with running claude in the project folder you want to work on, asking a question so it learns the folder, requesting one small edit, and checking the result yourself. Claude Code is a terminal coding tool made by Anthropic. It reads files, edits them, and runs commands. This guide follows the official docs as of November 10, 2026. It covers the order of your first task, how to choose a permission mode, and how to undo a bad edit. Installation and pricing are covered in Claude Code install, pricing, and usage limits.
What to ask first when you open Claude Code
Setup is done, but all you see is a black screen and a blinking cursor. It is hard to know what to type. Think of a new hire. You would not hand them the whole company on day one. You would ask them to explain the folder structure, then give them one small job. Claude Code works the same way. Let it read and understand the folder first, then ask for a small edit, so the result is easy to review. Just as Google reads a page before it ranks it, Claude Code answers accurately only about the files it has read. If you hand over a big job at the start, it is hard to follow what changed. Keep the first task to about one file.
To use Claude Code, the official setup docs say you need a Pro, Max, Ultra, Team, or Enterprise subscription, or a Console account. The free claude.ai plan does not include Claude Code. You can also use it through a cloud provider such as Amazon Bedrock. If you have several accounts, see how to choose and switch between multiple Claude Code accounts.
How to use Claude Code: the first task in 5 steps
These steps follow the Claude Code quickstart. First, check that the install worked.
- Type
claude --versionin the terminal (how to verify your installation). If the version number is followed by(Claude Code), it is installed. If you see an error thatclaudecannot be found, open a new terminal window and try again. If that still fails, fix your PATH setting (the list of places the shell looks for commands). - Move to the folder you want to work in and type
claude. On the first run, a login prompt appears. With a subscription or Console account, sign in through the browser. After you log in once, your credentials are saved and you do not enter them again. - Let it learn the folder. Ask something like
what does this project do?orexplain the folder structure, and it will read the files and summarize them. - Ask for one small edit. For example,
README에 설치 방법 한 단락을 추가해 줘names the file and the content. The official docs advise that "fix the blank screen that appears when login fails" is better than "fix the bug." - Check the result. To see what changed, ask
what files have I changed?, or in a Git project, look at it yourself withgit diff.
There are two success criteria. The (Claude Code) version prints in the terminal, and the file you asked it to edit actually contains what you wanted. Then your first task is done. For complex jobs, do not pack everything into one sentence. The beginner tips in the quickstart give an example of numbering the requests 1, 2, 3 and splitting them into steps.

You do not need many commands. The full list is in the CLI reference. At first, the ones in the table below are enough.
| Command | What it does |
|---|---|
claude | Start in interactive mode |
claude "작업" | Start with a first request |
claude -p "질문" | Answer once and exit |
claude -c | Continue the most recent conversation in the current folder |
/clear | Clear the conversation history (inside a session) |
/help | See the available commands |
Claude Code permission modes: which one to choose
A permission mode sets which actions Claude can take without asking you. According to the official permission modes docs, pressing Shift+Tab during a session cycles through the modes in order. It is better to start with the mode that asks most often and loosen it step by step. You need to watch edits happen a few times before you can review what ran automatically.
| Mode | Runs without asking | Use it when |
|---|---|---|
| Manual(default) | Reads only | A project you are trying for the first time, sensitive work |
| acceptEdits | File edits inside the working folder and file commands like mkdir·mv·cp·rm | You want to hand off edits but review other commands yourself |
| plan | Reading and exploring only, no edits until you approve the plan | You want to see a plan before a big task |
| auto | Runs most actions after a classifier model reviews them | Repetitive work where you trust the direction |
| bypassPermissions | Everything, with no checks | Only in an isolated container or virtual machine |
The official docs say that from v2.1.283, interactive sessions in the terminal and VS Code start in auto mode. So depending on your version, Claude may act without asking from the start. In a folder you are using for the first time, press Shift+Tab right away to check the mode, and switch to plan or Manual if needed. Auto mode blocks risky actions by default, such as running curl | bash, production deploys, and force pushes. But the official docs say it does not guarantee safety. To set the starting mode, run something like claude --permission-mode plan. bypassPermissions has no confirmation prompts at all, so do not use it in a real working folder on your personal computer.

How to undo a bad edit in Claude Code
Claude Code creates a checkpoint (a saved snapshot of the file state at that moment) every time you send a request. If it edited something wrongly, type /rewind, or press Esc twice while the input box is empty. According to the checkpointing docs, you pick a point to go back to from the list. Then you choose whether to restore both code and conversation, the conversation only, or the code only. Checkpoints keep the most recent 100 per session, and session file snapshots are cleaned up after about 30 days by default.
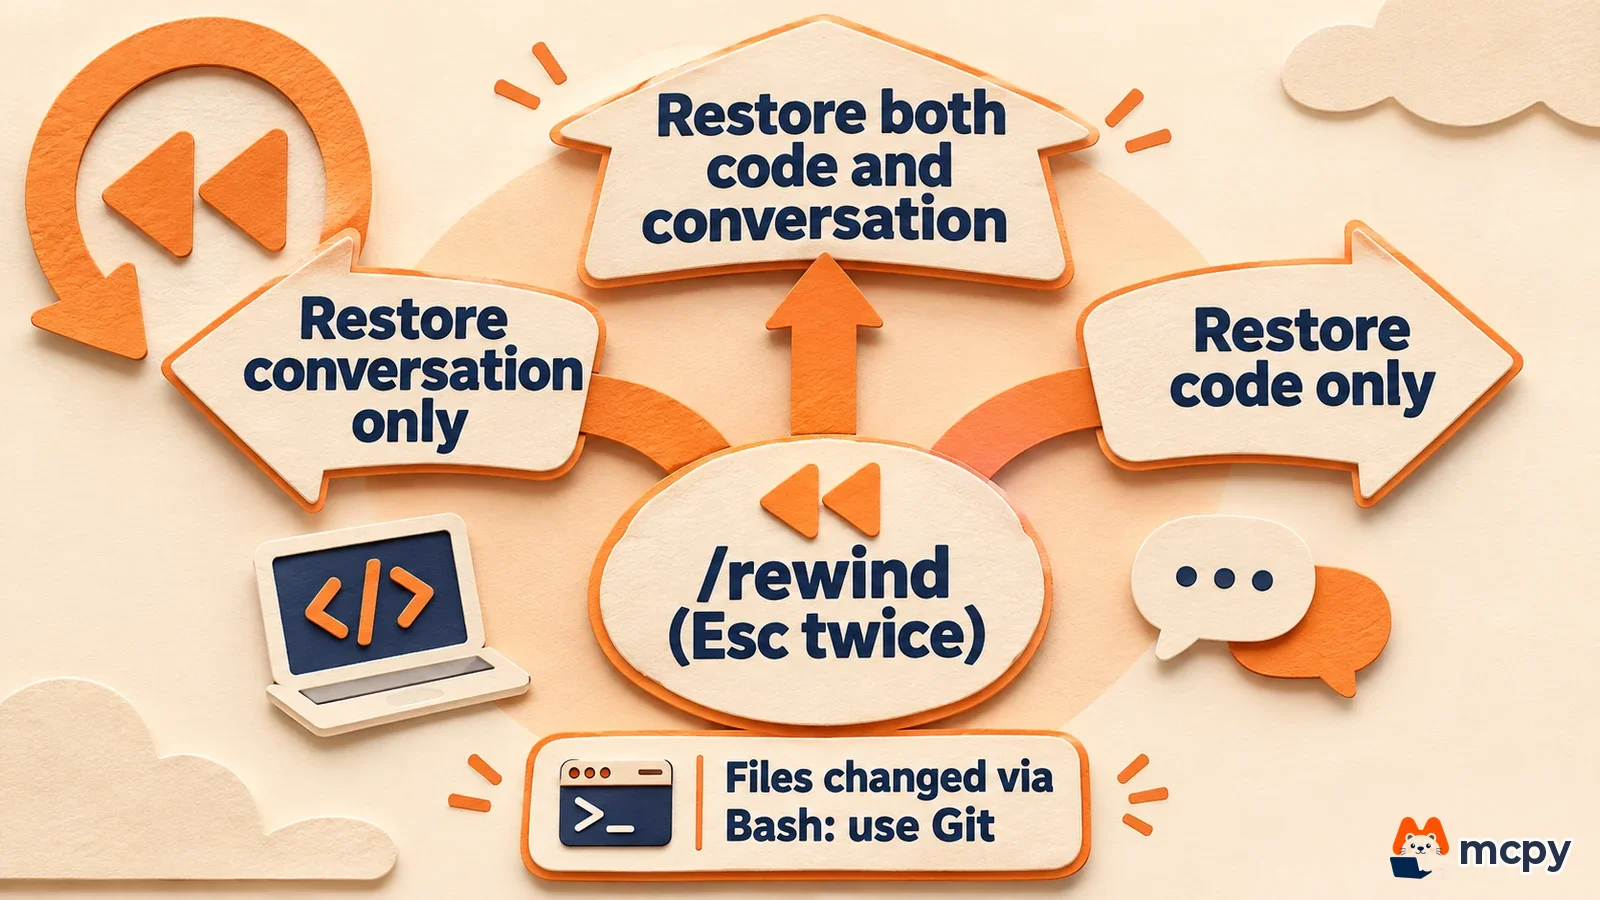
There are limits. /rewind may not restore files that Claude never edited and that were changed only by a Bash command, files you edited directly outside Claude, or files changed by a subagent. That is why the docs say checkpoints do not replace Git. For an important project, run git status before you start to confirm the tree is clean, and save your work with a commit when you finish.
Use CLAUDE.md if you do not want to repeat yourself
Claude Code starts each new session with a fresh conversation. If you do not want to repeat folder rules or common commands every time, write them in a file called CLAUDE.md. According to the official memory docs, typing /init makes Claude analyze the folder and draft a CLAUDE.md with build commands and rules. If the file already exists, it does not overwrite it and suggests improvements instead. The docs recommend keeping the file under 200 lines. A longer file uses more context and reduces how well instructions are followed. Why usage runs down fast is covered separately in why Claude Code token usage drops fast and how to reduce it.
Remember that CLAUDE.md is reference information, not an enforced rule. Writing a never-do rule in CLAUDE.md does not block it. The official docs tell you to use a PreToolUse hook or a deny rule. If you want to bundle a repeated workflow, how to create Claude skills is the next step.
Try plan mode and /rewind in a practice folder
Before you touch a real project, try permission modes and undo once in a practice folder. Then both features become familiar. The steps below take 4 steps.
- Make an empty folder, write one line, "test", in
memo.txt, and runclaudein that folder. - Press
Shift+Tabto switch to plan mode and askmemo.txt 끝에 오늘 날짜를 한 줄 추가해 줘. Claude should show only a plan and not edit the file until you approve. - After you approve the plan, open
memo.txtand check that one date line was added. - Use
/rewindto pick the point of your first request and restore the code. Ifmemo.txtgoes back to the single "test" line, you succeeded.
If you do not see the date in step 3, you did not approve the plan or you ran it in a different folder, so check your location with pwd first. After this practice, in a real project you can start by getting a plan in plan mode.
Claude Code vs Codex CLI: how the start differs
A similar terminal coding tool is OpenAI's Codex CLI. Both run in a project folder and change edit permissions inside the session. For Codex, see the Codex CLI docs and Codex CLI install and approval settings.
| Item | Claude Code | Codex CLI |
|---|---|---|
| Start command | claude | codex |
| macOS·Linux install | curl -fsSL https://claude.ai/install.sh | bash | curl -fsSL https://chatgpt.com/codex/install.sh | sh |
| Login | Subscription or Console account, browser sign-in | ChatGPT account and others, chosen at first run |
| Change permissions | Shift+Tab or --permission-mode | /permissions inside a session |
The reference date is November 10, 2026. It is faster to pick one tool, finish the 5 steps above first, and then compare.
Claude Code FAQ
Should I run /clear for every new task in Claude Code?
The official best practices docs recommend /clear when you move to unrelated work. The history of earlier work keeps affecting the cost and accuracy of the next task. If Claude is still wrong after you correct the same issue twice, do not add a third fix. The docs advise running /clear and starting over with one better request.
Do I have to update Claude Code myself?
According to the official setup docs, native installs update automatically in the background. To apply an update right away, run claude update. If you installed with Homebrew or WinGet, there is no auto-update, so run brew upgrade claude-code or winget upgrade Anthropic.ClaudeCode yourself. If the install looks wrong, diagnose it with claude doctor.
Do I need to install Git on Windows?
Not strictly. According to the official docs, if Git for Windows is missing, Claude Code uses PowerShell as its shell tool, and if it is installed, it uses Git Bash. You do not need it separately in WSL.
Found this useful? Share it
Related posts
Related projects
Get new posts by email
Insights on marketing, analytics, and dev, delivered to your inbox.